안녕하세요, 코린이의 코딩 학습기 채니 입니다.
[Node.js 교과서]의 책을 참고하여 포스팅한 개인 공부 내용입니다.
노드버드 SNS 만들기 - 게시글, 이미지 업로드하기
모델 구조
User.ts
import { DataTypes, Model, Sequelize } from "sequelize";
import Post from "./post";

type ProviderType = "local" | "kakao";

class User extends Model {
    public readonly id: number;
    public email: string;
    public nick: string;
    public password: string;
    public provider: ProviderType;
    public sns_id: string;

    static initiate(sequelize: Sequelize) {
        User.init(
            {
                email: {
                    type: DataTypes.STRING(40),
                    allowNull: true,
                    unique: true,
                },
                nick: {
                    type: DataTypes.STRING(15),
                    allowNull: false,
                },
                password: {
                    type: DataTypes.STRING(100),
                    allowNull: true,
                },
                provider: {
                    type: DataTypes.ENUM("local", "kakao"),
                    allowNull: false,
                    defaultValue: "local",
                },
                sns_id: {
                    type: DataTypes.STRING(30),
                    allowNull: true,
                },
            },
            {
                sequelize,
                underscored: true,
                timestamps: true,
                modelName: "User",
                tableName: "users",
                paranoid: true, // deleted_at 추가 (soft delete)
                charset: "utf8",
                collate: "utf8_general_ci",
            }
        );
    }

    static associate() {
        User.hasMany(Post);
        // 팔로워
        User.belongsToMany(User, { foreignKey: "following_id", as: "followers", through: "Follow" });
        User.belongsToMany(User, { foreignKey: "follower_id", as: "followings", through: "Follow" });
    }
}

export default User;
Post.ts
import { DataTypes, HasManyAddAssociationMixin, Model, Sequelize } from "sequelize";
import User from "./user";
import Hashtag from "./hashtag";

class Post extends Model {
    public readonly id: number;
    public content: string;
    public img: string;
    public addHashtags: HasManyAddAssociationMixin<Hashtag[], number>;

    static initiate(sequelize: Sequelize) {
        Post.init(
            {
                content: {
                    type: DataTypes.STRING(140),
                    allowNull: false,
                },
                img: {
                    type: DataTypes.STRING(200),
                    allowNull: true,
                },
            },
            {
                sequelize,
                underscored: true,
                timestamps: true,
                paranoid: false,
                modelName: "Post",
                tableName: "posts",
                charset: "utf8mb4",
                collate: "utf8mb4_general_ci",
            }
        );
    }

    static associate() {
        Post.belongsTo(User);
        Post.belongsToMany(Hashtag, { through: "post_hashtag" });
    }
}

export default Post;
typescript에서는 컴파일 시 모델 연결이 불가하므로, 가상으로 addHashtags를 선언해주었습니다.
다대다 관계에서 브릿지 테이블에 간편히 추가할 수 있도록 선언해줍니다.
https://sequelize.org/docs/v6/other-topics/typescript/
TypeScript | Sequelize
We're working hard on making Sequelize a breeze to use in TypeScript.
sequelize.org
Hashtag.ts
import { DataTypes, Model, Sequelize } from "sequelize";
import Post from "./post";

class Hashtag extends Model {
    public readonly id: number;
    public title: string;

    static initiate(sequelize: Sequelize) {
        Hashtag.init(
            {
                title: {
                    type: DataTypes.STRING(15),
                    allowNull: false,
                    unique: true,
                },
            },
            {
                sequelize,
                timestamps: true,
                paranoid: false,
                underscored: true,
                modelName: "Hashtag",
                tableName: "hashtags",
                charset: "utf8mb4",
                collate: "utf8mb4_general_ci",
            }
        );
    }

    static associate() {
        Hashtag.belongsToMany(Post, { through: "post_hashtag" });
    }
}

export default Hashtag;
프론트단 코드 (게시글, 이미지 업로드)
main.html
{% extends 'layout.html' %} {% block content %}
<div class="timeline">
    {% if user %}
    <div>
        <form id="twit-form" action="/post" method="post" enctype="multipart/form-data">
            <div class="input-group">
                <textarea id="twit" name="content" maxlength="140"></textarea>
            </div>
            <div class="img-preview">
                <img id="img-preview" src="" style="display: none" width="250" alt="미리보기" />
                <input id="img-url" type="hidden" name="url" />
            </div>
            <div>
                <label id="img-label" for="img">사진 업로드</label>
                <input id="img" type="file" accept="image/*" />
                <button id="twit-btn" type="submit" class="btn">짹짹</button>
            </div>
        </form>
    </div>
    {% endif %}
    <div class="twits">
        <form id="hashtag-form" action="/hashtag">
            <input type="text" name="hashtag" placeholder="태그 검색" />
            <button class="btn">검색</button>
        </form>
        {% for twit in twits %}
        <div class="twit">
            <input type="hidden" value="{{twit.User.id}}" class="twit-user-id" />
            <input type="hidden" value="{{twit.id}}" class="twit-id" />
            <div class="twit-author">{{twit.User.nick}}</div>
            {% if not followingIdList.includes(twit.User.id) and twit.User.id !== user.id %}
            <button class="twit-follow">팔로우하기</button>
            {% endif %}
            <div class="twit-content">{{twit.content}}</div>
            {% if twit.img %}
            <div class="twit-img"><img src="{{twit.img}}" alt="섬네일" /></div>
            {% endif %}
        </div>
        {% endfor %}
    </div>
</div>
{% endblock %} {% block script %}
<script>
    if (document.getElementById("img")) {
        document.getElementById("img").addEventListener("change", function (e) {
            const formData = new FormData();
            console.log(this, this.files);
            // formData.append("text", "text") 처럼 text와 같이 사용 시, multer 사용하면 image를 가장 마지막에 넣어줘야함
            // 그렇지 않으면, text가 잘 넘어가지 않음
            formData.append("img", this.files[0]);
            axios
                .post("/post/img", formData)
                .then((res) => {
                    document.getElementById("img-url").value = res.data.url;
                    document.getElementById("img-preview").src = res.data.url;
                    document.getElementById("img-preview").style.display = "inline";
                })
                .catch((err) => {
                    console.error(err);
                });
        });
    }
</script>
{% endblock %}
서버단 코드 (이미지 업로드)
이미지 업로드를 위해 multer 패키지를 설치합니다.
$ yarn add multer

# typescript라면 아래 패키지도 추가
$ yarn add --dev @types/multer
이미지 업로드하는 Middleware
upload - uploadImageMiddleware
import { Request } from "express";
import multer from "multer";
import path from "path";

export const uploadImageMiddleware = multer({
    // diskStorage에 저장
    storage: multer.diskStorage({
        destination(req: Request, file: Express.Multer.File, cb: any) {
            cb(null, "uploads/");
        },
        filename(req: Request, file: Express.Multer.File, cb: any) {
            console.log("file:", file);
            const ext = path.extname(file.originalname);
            cb(null, path.basename(file.originalname, ext) + Date.now() + ext);
        },
    }),
    // 파일 최대 크기 설정
    limits: { fileSize: 5 * 1024 * 1024 },
}).single("img");
filename → "파일이름123493836101.png" 와 같은 형식으로 저장되게 설정
destination → uploads 폴더에 저장되게 설정
또한, 하나의 이미지만 저장되도록 설정하였기 때문에 "img"라는 fieldName을 가진 하나의 데이터를 저장하도록 하였습니다.
(하나 이상의 이미지 저장을 하고 싶다면 array() 혹은 fields() 이용)
controller
post.ts
import { NextFunction, Request, Response } from "express";

export const uploadImage = (req: Request, res: Response, next: NextFunction) => {
    try {
        // multer 설정을 single로 했기 때문에 req.file에 업로드한 파일이 담김
        // array, field는 req.files에 담김
        console.log("req.file", req.file);

        // 프론트 단에 url을 보내줌.
        res.json({ url: `/img/${req.file?.filename}` });
    } catch (err: any) {
        console.error(err);
        next(err);
    }
};
multer를 통해 이미지 업로드를 진행하면, 업로드된 이미지 파일은 req.file에 담기게 됩니다.
(멀티 이미지 등록은 req.files에 담기게 됨)
업로드된 이미지 파일의 url를 프론트 단에 보내주어 미리보기 이미지를 지원할 수 있도록 해주었습니다.
router
post.ts
import express from "express";
import { isLoggedIn } from "../middlewares";
import fs from "fs";
import { uploadImageMiddleware } from "../middlewares/upload";
import { uploadImage } from "../controllers/post";

const router = express.Router();

// uploads 폴더 생성
try {
    fs.readdirSync("uploads");
} catch (err: any) {
    // uploads 폴더가 없다면 생성해준다.
    fs.mkdirSync("uploads");
}

router.post("/img", isLoggedIn, uploadImageMiddleware, uploadImage);

export default router;
app.ts
// 프론트단에서 서버의 폴더에 접근하기 위해 설정 (img 경로로 uploads 폴더를 가져올 수 있음)
app.use("/img", express.static(path.join(__dirname, "uploads")));
프론트 단에서 서버의 폴더에 접근할 수 있도록 설정해주었고, /img 경로를 통해 접근할 경우로만 제한해줍니다.


이미지가 정상적으로 업로드 되고, 미리보기도 보여지는 것을 확인할 수 있습니다.
서버단 코드 (게시글 업로드)
controller
post.ts
import { NextFunction, Request, Response } from "express";
import Post from "../models/post";
import Hashtag from "../models/hashtag";

export const uploadPost = async (req: Request, res: Response, next: NextFunction) => {
    try {
        const post = await Post.create({
            content: req.body?.content,
            img: req.body?.url,
            UserId: req.user?.id,
        });

        // # 다음에 공백 | #이 아닌 나머지를 추출
        const hashtags = req.body?.content.match(/#[^\s#]*/g);
        console.log(hashtags);

        if (hashtags) {
            const createHashtag = hashtags.map((hashtag: string) => {
                return Hashtag.findOrCreate({
                    where: { title: hashtag.slice(1).toLowerCase() },
                });
            });

            const result = await Promise.allSettled(createHashtag);
            await post.addHashtags(
                result.map((r) => {
                    if (r.status === "fulfilled") {
                        return r.value[0];
                    }
                })
            );
        }

        res.redirect("/");
    } catch (err: any) {
        console.error(err);
        next(err);
    }
};
입력한 content와 img는 req.body를 통해 추출하고,
passport 로그인으로 인해 req.user에 저장된 user정보를 통하여 user_id를 가져와 생성해줍니다.
findOrCreate는 where 절에 정의한 컬럼에 대해 값이 있으면 생성하지 않고, 없으면 생성 해주는 메소드입니다.
Hashtag.findOrCreate는 Promise.allSettled()를 통하여 비동기함수를 한 번에 처리하였습니다.
Promise.allSettled()는 status(성공여부) 와 value를 리턴해주고, findOrCreate()는 [값, 생성여부]를 리턴해주기 때문에
result를 돌면서 status가 "fulfilled"(성공)인 값들의 r.value[0] 즉 값만 추출하여 post_hashtag 브릿지 테이블에 추가해줍니다.
router
post.ts
router.post("/", isLoggedIn, multer().none(), uploadPost);


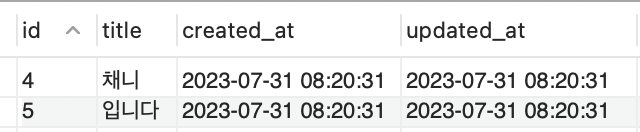

정상적으로 DB에 저장된 것을 확인할 수 있습니다.
'JavaScript > Node.js' 카테고리의 다른 글
| Node) API 사용량 제한하기 (express-rate-limit) (0) | 2023.08.28 |
|---|---|
| Node) Sequelize Migration (0) | 2023.07.28 |
| Node) 사용자 인증 정보 확인 후 다음 미들웨어에게 해당 정보 넘겨주기 (0) | 2023.02.03 |
| Node) 부모 라우터의 req.params를 자식 라우터에게 넘기기 - 중첩라우터 (0) | 2023.02.02 |
| Node) React + Node로 infinity scroll 페이징 처리 (observer) (0) | 2023.01.25 |
